
UltraScan III Installation:
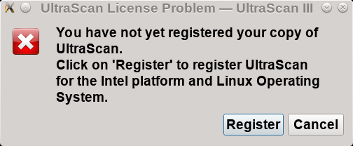
UltraScan III is available for free download in binary or source-code format for three major operating systems: Windows, Macintosh, and Linux. The installation instructions vary for different platforms, please consult the operating system-specific instructions below. After installation, each copy must be registered. If UltraScan has not previously been registered, a dialog pops up:
After clicking on "Register", the registration dialog opens up:
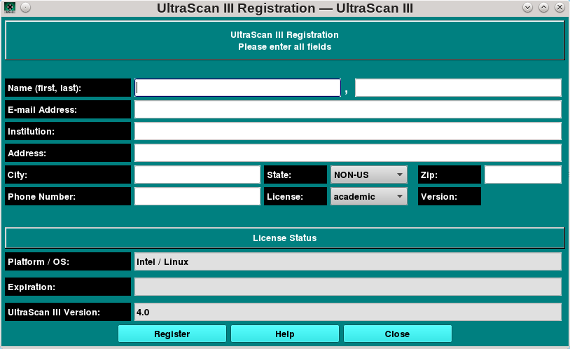
Fill in your contact information and click on "Register" to submit your registration. A 1 year license file for the appropriat use and operating systems will be generated remotely, which should be received by clicking on "Finish Registration". An e-mail will be sent to the registered e-mail address to validate that the license has been generated:

The last step is to click on "Finish Registration" to confirm receipt of the license. The leftmost button now should read "Update/Renew":

The licence will expire after one year and needs to be renewed by simply clicking on the "Update/Renew" button.
Configuration: Configure your new installation by selecting "Edit:Preferences" from the main menu. Preference settings on a Macintosh computer can be found under the standard configuration places for Macintosh software. The following items should be configured:
- Default Data Location: Database (selected)
- Master Password: Change to something you can remember!
- Advanced Settings: Debug Level: 0
- Advanced Settings: Advanced Level: 0
- Advanced Settings: Number of Threads: Concurrent processes available from your hardware (typically 4)
- Advanced Settings: Noise Dialog Flag: 0
Then click "Save" and store new settings.
For LIMS integration, your LIMS account must be upgraded to user-level 2 first before you can access LIMS database functionality from your LIMS account. This will be handled by the LIMS manager for your LIMS instance.
Operating System Specific Instructions:
- Microsoft Windows: Download the installation file and execute it on your computer. When prompted for an installation directory, please choose C:\Program Files\UltraScan, this is the expected path. If your international version of Windows has a different path, please create this subdirectory first before installation. On Windows 7, also install in C:\Program Files\UltraScan, not in C:\Program Files (x86)\UltraScan. You may have to run the program as Administrator.
- Mac OS-X: Download and Double-click the installation package. If you have not previously installed XQuartz, you will be requested to do so. XQuartz can be downloaded from https://www.xquartz.org.
- Linux, Unix/X11:
To install the tar.xz package for any distribution, please follow these steps:
- After downloading the tar.xz package, you need to uncompress and extract it in a location
of your choice, for example, /usr/lib or /usr/local or /usr/local/lib. For the purpose of
this document, it is assumed you are going to install UltraScan in /usr/lib and /path is
the path to your downloaded file.
cd /usr/lib
tar Jxf /path/ultrascan-version.tar.xz
At this point, a new directory will be created (you can rename it without issue) Under that directory will be abinsubdirectory. In thebinsubdirectory are two scripts:us.sh us_somo.sh
You can run these to start the UltraScan GUI and the US-SOMO GUI respectively.
- After downloading the tar.xz package, you need to uncompress and extract it in a location
of your choice, for example, /usr/lib or /usr/local or /usr/local/lib. For the purpose of
this document, it is assumed you are going to install UltraScan in /usr/lib and /path is
the path to your downloaded file.